Reception Portal in Ubik: Know Each Tab and Front Desk Tool
The Reception Portal is the daily workspace for the front desk team. It helps reception find scheduled patients, see who is currently being treated, collect payments, make quotes, sell products, process refunds, and identify where staff are working.
This guide explains where the portal is, what each section means, and which button to use for common reception tasks.
Open the Reception Portal
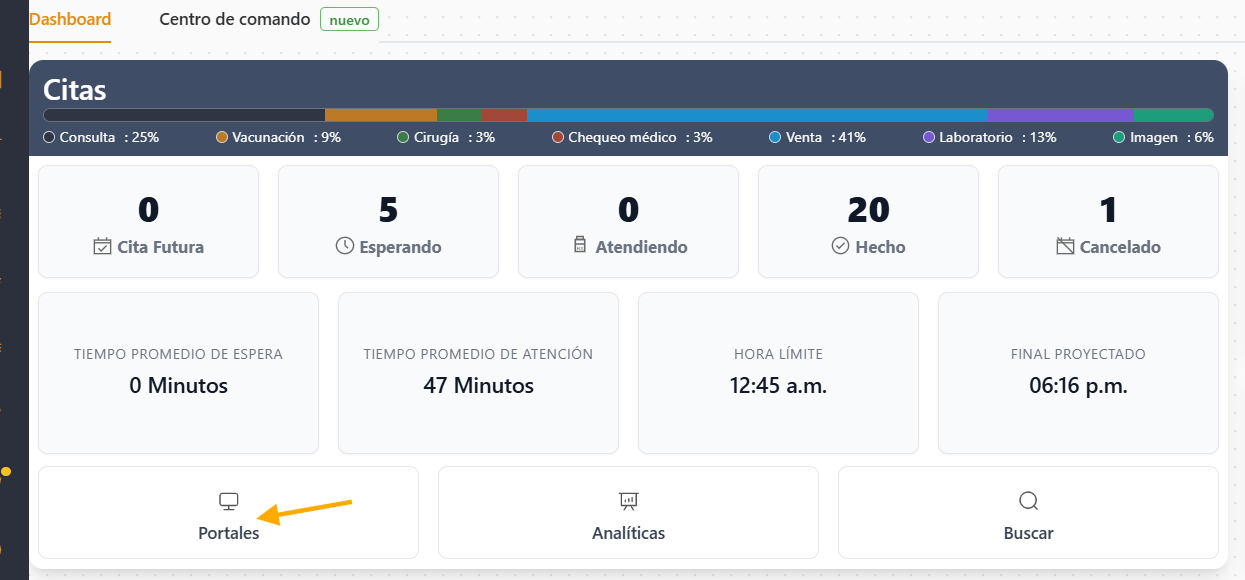
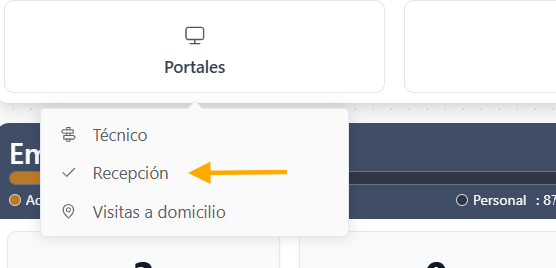
From the main Ubik dashboard, open Portals and select Reception.
In most clinics, reception users should land directly in this portal when they sign in. If a user lands somewhere else, they can still open it from the Portals area.
Reception Portal Tabs
The tabs across the portal organize the work by status and workflow. Reception can move between them depending on what the client needs.

Appointments
Appointments is the default tab when you enter the portal.
Use it to review:
- Scheduled appointments.
- Patients that are pending discharge.

Referral Tray
The Referral Tray contains referrals received by the clinic for review and follow-up.
Use this tab when the clinic needs to review incoming referrals before scheduling or continuing care.

Active Care
Active Care shows patients currently being attended by the clinic team.
Examples include:
- Patients in consultation.
- Hospitalized patients.
- Boarding or hotel patients.

Ready for Payment
Ready for Payment shows patients whose care has finished and who are ready to pay at reception.
This is the main tab for checkout. When a doctor, groomer, or technician sends a patient to payment, reception should usually look here first.

Follow-Up
Follow-Up helps reception schedule future appointments for services that require a return visit.
It may show patients who need to come back for:
- Vaccination.
- Deworming.
- Grooming or bathing.
- Other recurring services or follow-up programs.
For reminders to appear here, the related service or program must already be configured in Ubik.

Upper-Right Tools
The upper-right tools handle money, quotes, new appointments, product sales, refunds, and staff location.
$: Register and Cash Tools
Use the $ button for register-related tasks.
From here, reception can:
- Complete register close.
- Review cashier totals.
- See how much each receptionist has received.
- Review totals by payment method, including cash, credit card, debit card, and other methods.

Create Quote
Use Create Quote whenever a client asks for prices.
Reception should not use Add Appointment or Sell Product only to look up or provide a price. For price questions, always create a quote so the client receives a clear estimate and the clinic keeps the workflow separate from real appointments or sales.

Add Appointment
Use Add Appointment to create and schedule a new appointment for a patient.
This is the correct action when the client is ready to book a visit.

Sell Product
Use Sell Product as the point-of-sale workflow.
This is the right option when the client is only buying a product and does not need an appointment.

Refund Purchase
Use Refund Purchase when the clinic needs to process a return.
It can also be used when a sale was started and later needs to be reversed.
Work Location
Use Work Location to show which reception desk, consult room, or area a staff member is working from.
This location can also work with the lobby display so clients and staff can see the correct staff location.

Reception Reminder
Use the Reception Portal based on what the client is trying to do:
- For scheduled patients, start with Appointments.
- For patients already being treated, check Active Care.
- For checkout, use Ready for Payment.
- For return visits, use Follow-Up.
- For price requests, use Create Quote.
- For product-only sales, use Sell Product.
- For drawer and cashier review, use the $ tools.
Choosing the right tab keeps reception faster, keeps quotes separate from sales, and helps the rest of the clinic trust what each record means.